Photo feedback and Critique
Ya now that you mention it I did not even notice the fun box inthe shot until now. After you look at a photos for a while it all looks the same I will touch this one up a little more and repost it,
Thanks for all the feedback
Ya now that you mention it I did not even notice the fun box inthe shot until now. After you look at a photos for a while it all looks the same I will touch this one up a little more and repost it,
Thanks for all the feedback
don’t think a crop is going to fix this shot. If it was looser to begin with then maybe, but cropping while keeping the aspect ratio is going to cut more of the box at the bottom (unless you choose to cut his fingertips). Ignoring the aspect ratio will just give away the fact that you didn’t take a perfect shot and had to crop.
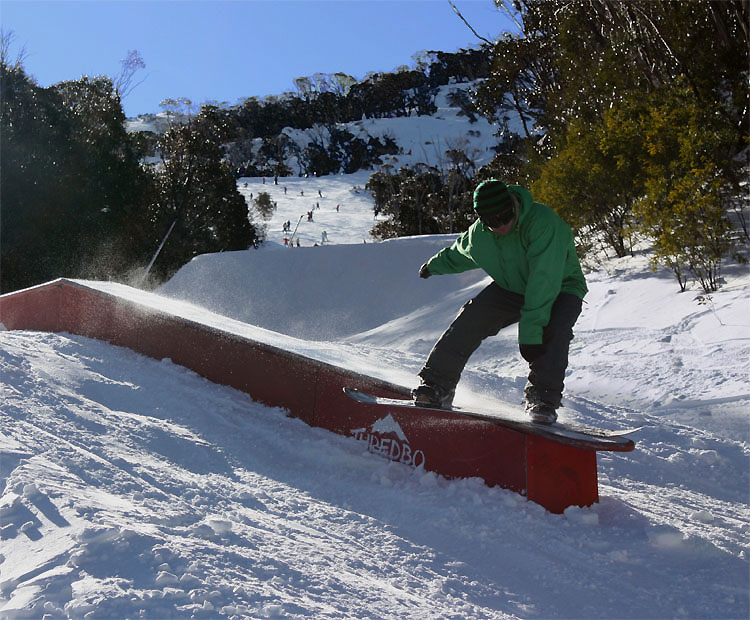
I’m posting another photo for critique. This isn’t one of my favourites, but I would like to know how I could have improved on this shot.

Mitch Faber at Cammeray Skatepark
Hey, give us a bit of a self-crit just so we know what you’re thinking of this pic. For example if you get 20 people saying “Yo, the action is centred” and you knew this already, it gets annoying real fast. Maybe do a pros and cons list, or just a cons even.
Looks like a fun park.
Pros: In focus, centred.
Cons: Lighting looks off, contrast of the skater, skater maybe too high in the frame.
I will also mention the photo is unedited.
You listed ‘centred’ as one of your pros, but I think it works against you in this shot. If you look at the action, it’s only happening in the narrow section in the middle of the photo. the sides can be considered dead space. Shooting this head on, you’ve compressed the space between the skater and the feature so if you were to shoot this angled then the action would take up a bigger portion of the photo. Think about leading lines and what they do to the eyes of the person looking at your photo. In this one, the eyes go straight to the middle of the shot (the skater) and then? The eyes are quick to lose interest. This is why there is the rule of thirds, so that your eyes travel through a photo, absorbing more details.
Anyways, I think this shot should be reshot vertically for two reasons. 1) it feels cramped at the top. It almost looks like the skater is bending his arm to get into the shot. So a bit more headroom would be good. 2) you can’t really see the feature at the bottom. Without this, we don’t have a sense of scale. Is he ollieing using the feature as a boost? Can’t really tell. So back up and get the all the importants bits of the story you’re trying to tell.
Lighting is similar to your first photo. If you had another dude standing around, get him to hold a reflector (those shiny sunscreens you can put on your dashboard/windshield do the trick) and get some light on the skater’s face.
If you’re using that 50mm 1.8 then get the aperture open and throw the background out of focus. It’s not very interesting, and in the skate photo wo???, park photos don’t get much love.
Lastly, the timing might be early. I think I’d rather see the board flatter as it’s being kicked out.
Thank you for the feedback Gamblor.
Once again I agree with your points. I definitely should have taken this photo vertically. Good points about the angle and action space. I need to start playing more with aperture and I should have opened it up more as you pointed out. I think the timing was off too.
Do you think a flash would have helped with the lighting?
Yes, flash would help but that’s a whole new can of worms. On camera flash is pretty crap so you’d need either triggers or a cord. But then you can only hold the flash in your left hand (camera’s in the right). If you get triggers then you prob need a tripod for the flash and then your gear bag becomes real heavy. By triggers I mean stuff like ebay triggers, wein peanut triggers, pocket wizards, etc. But like I said, just pick up a reflector if you have someone hanging around to hold it. On a sunny day it’s all you need.
Anyone got any tips for shooting at the snow?
As with im assuming most Aussie resorts, my regular resort Thredbo is on the southern side of the hill which gets the most shade and keeps the snow longer.
Unfortunately that means when shooting in the park you are almost always shooing into the sun and you get a lot of lens flare and also shading accross the face.
I switched to taking my camera up in the morning and shooting then instead of the afternoon and that has helped a bit, but the sun is still quite low.
Im not sure if spending a couple of hundred $$ on a good flash (if i decide i can afford it) is going to solve the lighting problem.
Any tips?
I just shoot for fun so im not really looking to carry around or have someone holding a reflector for me but if a good flash is going to help me i might consider it.
Any other tips on the shots would be helpful, you might have seen them in the SoHe photo comp last year.

EvanL,
yeah for snow shots carrying around flashes becomes quite a mission. It’s bad enough trying to ride with a dslr in your pack, let alone having said pack full of expensive flashes which you may or may not use. If I was you, I prob wouldn’t bother since I don’t bother myself.
Since I’ve never been to Thredbo, I can’t really comment on how to use the sun to your advantage. I would suggest looking through mags that feature shots from there and seeing how those photogs nail those shots. Look at the light, the angles and the tricks. Figure out what the photog was thinking when he took that shot. Why did he choose this angle? etc Also, learning to critique shots helps you too. Not all shots published are good shots and it’s good practice to decide why a certain shot isn’t up to par in your opinion.
Off the top of my head I’d say check out Dan Himbrechts’ photography as he always has good shots.
And since you put up two shots in this thread I’d say they’re fair game to be critiqued!
1st shot:
-you’ve got the entire rail thing in the shot which I like as I can see what type of item it is.
- the lighting is nice. the snow trails being backlit are really cool. I’d be stoked if this photo was of me.
- you’ve got an unnatural crop on the photo. Either you were shooting in medium format or you cropped your shot. I’d bet you cropped it to make the shot look better -> which means you didn’t take a perfect shot to begin with. Thumbs down. If you’re going to crop, keep the aspect ratio the same -> then nobody will know!
-negative points for the rider. Get him to swing right around so he’s 90 degrees to the rail. Let’s get legit here!
2nd shot:
-background is too busy. Find an angle where your rider stands out ie against snow. Use a lens with a shallow depth of field to blur out the background.
-again the trick isn’t legit. He’s not pressing, nosesliding or boardsliding. It’s not that hard to go from his position to a legit position. As a photog, check the trick in the lcd and tell him to hike back up and do it again! If he gets in done, it’s a total win-win situation. You took a cool photo and he gets a shot of himself doing something cool.
To be fair, it’s hard to get good shots on small items like that.
Yeah, always looking at the Photo Editions of Transfer, Australain Snowboarder etc. for the cool shots and ideas.
And you were right, the shot was cropped but i get your idea on keeping the aspect the same.
Apoligies for the non-legit tricks ![]()
Its just me (green jacket) and my brother (red). He’s usually pretty good but i tend to get a bit sloppy. I’ll work on it ![]()
Bring on season 2010.
Thanks for the tips though.
Here is a sequence I did before I watched the redbull vid. I picked up a few tips that could make it cleaner but figured I would share this one and see what you all have to say.

not bad but you’ve done the sequence backwards. start with the first pic first and then layer on top of it. It’s noticeable on the 3rd shot - his hand is over top of the 4th shot. This is unnatural and feels like you’re bending the space and time continuum. ![]() but now that i think about it more, it would look weird too to have the hand covered by the back of the 4th shot. meh, I’m not a fan of sequences anyways.
but now that i think about it more, it would look weird too to have the hand covered by the back of the 4th shot. meh, I’m not a fan of sequences anyways.
There’s dead space on the left and the dude is cut on the right. I would delete the final shot because who needs just the riders’ ass?
but then you’re left with a sketch-like landing…
So I wouldn’t bother making this a sequence at all. Just from the 3rd shot alone we know what is happening. If he was doing a shuvit out then a sequence would be better.
Ha see thats why I wanted the crit on this one…being a first for me I really did not think of which way it should layer. It is all a little tight together and on the next shoot a couple steps back for will give more room to spread the action and balance the shot (keeping free of the dead space and lack of landing)
Thanks for the feedback helps having fresh eyes
Anyone got any tips for shooting at the snow?
As with im assuming most Aussie resorts, my regular resort Thredbo is on the southern side of the hill which gets the most shade and keeps the snow longer.
Unfortunately that means when shooting in the park you are almost always shooing into the sun and you get a lot of lens flare and also shading accross the face.
I switched to taking my camera up in the morning and shooting then instead of the afternoon and that has helped a bit, but the sun is still quite low.
Im not sure if spending a couple of hundred $$ on a good flash (if i decide i can afford it) is going to solve the lighting problem.
Any tips?
I just shoot for fun so im not really looking to carry around or have someone holding a reflector for me but if a good flash is going to help me i might consider it.Any other tips on the shots would be helpful, you might have seen them in the SoHe photo comp last year.
If you want to see a million photo’s of Thredbo check http://www.hotshots.net.au they’ve been shooting the mountain for over 30 years. If you want a job PM me.
Best tip for snow photography. SHOOT THE SUBJECT NOT THE SNOW. Set your camera up really close to your subject (their face). On those settings move back to your shooting position and snap away. At first you will find the snow gets blown out but fiddling with your settings can adjust this, just make sure the subjects face still fancies the setting.
High noon park; I always shoot from the Merritts side to get a little sun advantage and mostly shoot downhill for the same reason. Flash can help but it’s best to learn how to shoot without then use it when necessary.
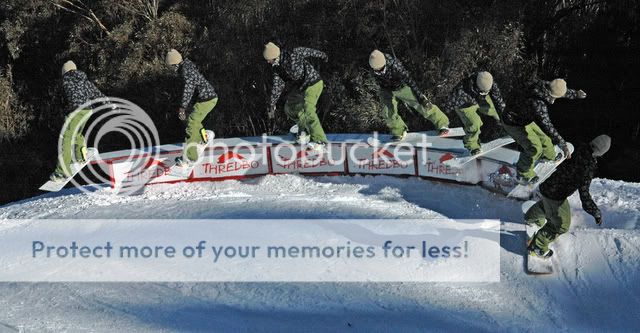
These photos are 3 or 4 years old. The sequence was the first I ever did. But no enhancements are made to light/colour etc. it is under exposed (to say the least) which is what shooting in the snow often makes us do. The first shot has only been cropped - it looked better uncropped.